
Mastering Bathtub Refinishing: Steps 6 to 10
Mastering Bathtub Refinishing: Steps 6 to 10
Discover 15 Essential Tips for Successful Bathtub Refinishing in Arizona Cities here steps 11-15! Your go-to guide for top-notch refinishing services. 🛁 #BathtubRefinishing #ArizonaCities”.
Transform Your Bathtub with Professional Refinishing
Master the Process for Stunning Results!
Refinishing a bathtub isn’t just a task—it’s an art form. 🎨 Each step in the process, from prep to polish, plays a vital role in achieving a flawless finish that revitalizes your bathroom. Let’s dive into steps 11 to 15 of the process:
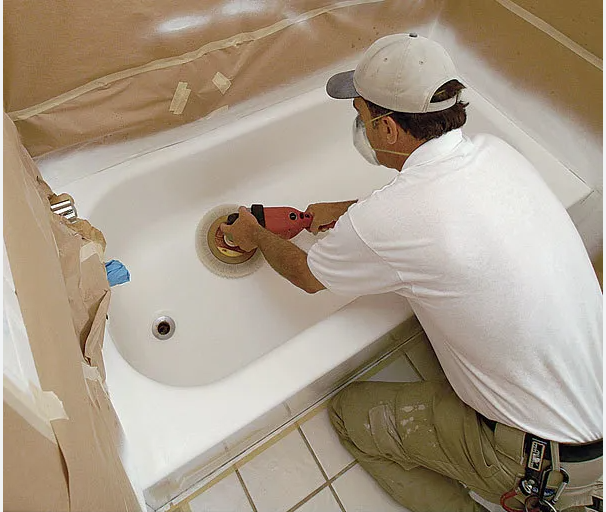
Step 11: Buff and Polish the Surface
After applying the final coats, it’s time to buff and polish the surface to perfection. This step ensures a smooth, glossy finish that enhances the bathtub’s aesthetic appeal. 💫
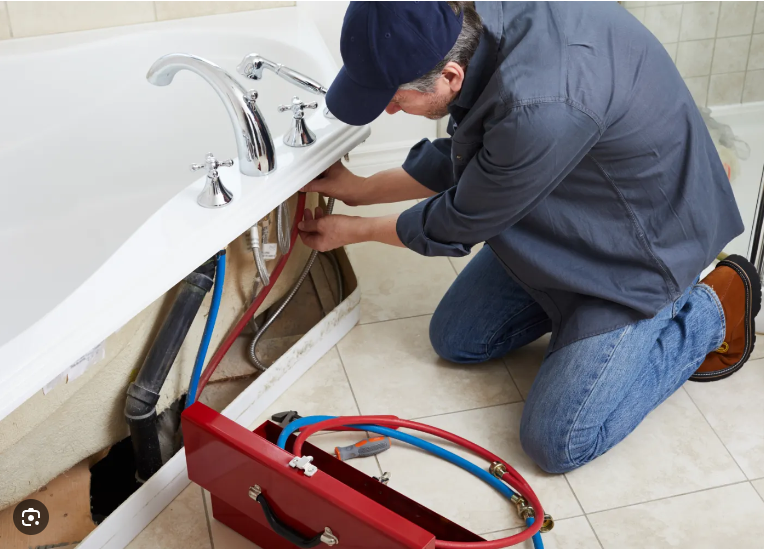
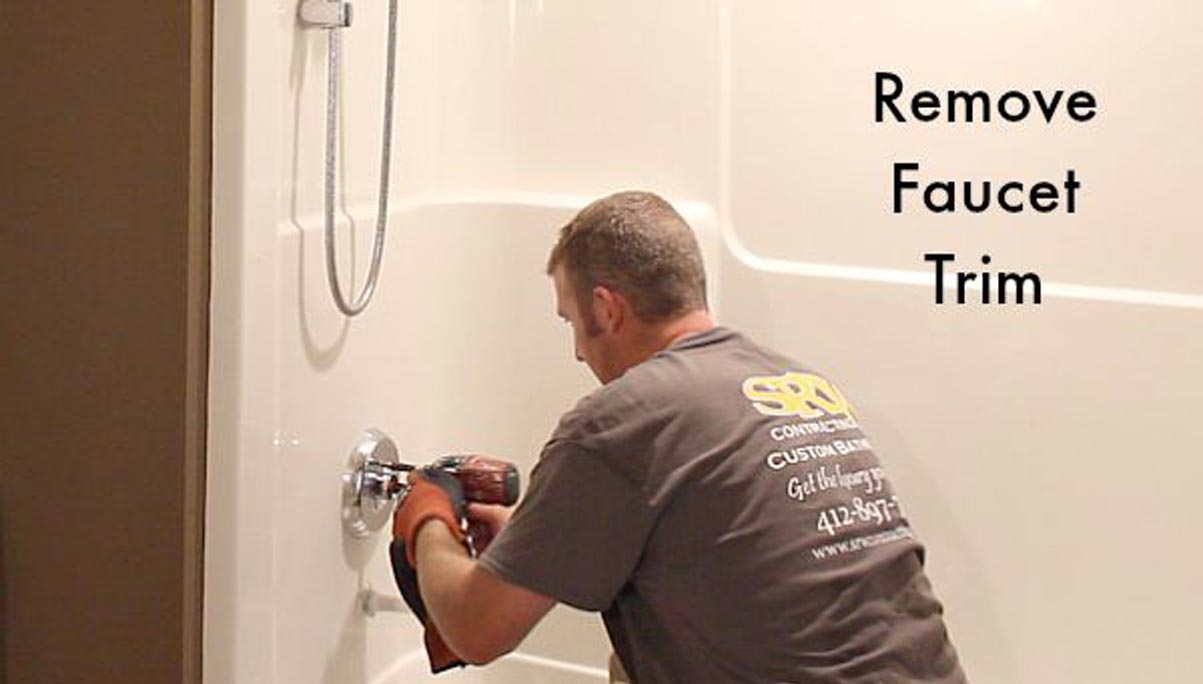
Step 12: Reinstall Tub Hardware
Don’t forget to reinstall the tub hardware for that final touch of functionality and style. Proper installation ensures everything is secure and looks fantastic. 🔧
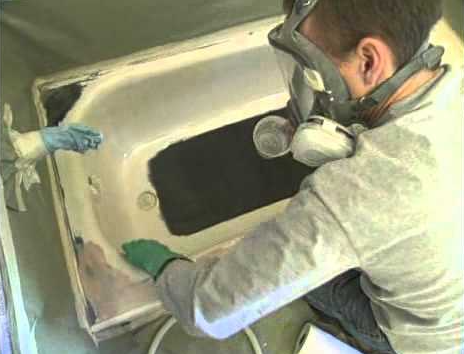
Step 13: Inspect Imperfections with Precision
Use a phone light or halogen flashlight to meticulously inspect the surface for imperfections. Attention to detail ensures a flawless result that exceeds expectations. 🔍
Step 14: Clean Up with Care
Once the job is done, it’s time to tidy up the work area. A clean workspace reflects professionalism and ensures a safe environment for all. 🧹
Step 15: Offer Expert Care Recommendations
Provide your clients with valuable care recommendations to maintain their newly refinished bathtub’s beauty and durability. Empower them to enjoy their investment for years to come! 🛁✨
Remember, mastering each step of the refinishing process is crucial, especially when working with potentially hazardous materials. Dive deep into your studies and practice diligently to deliver exceptional results every time!
For more expert tips and insights on bathtub refinishing, visit ArizonaBathtubRefinishing.com. 🚿
1
2
3
4
Step 11: Buff and Polish the Surface
Mastering Step 11: Buff and Polish the Surface
Achieving a Flawless Finish for Your Refinished Bathtub
Step 11 of the bathtub refinishing process, buffing and polishing the surface, is where the magic truly happens. This crucial step transforms the freshly coated bathtub into a smooth, glossy masterpiece that enhances the overall aesthetic of the bathroom. Let’s delve into the importance of this step and how it contributes to the success of your refinishing project.
Why Buffing and Polishing is Essential
After applying the final coats of epoxy coating, the surface may have minor imperfections or uneven areas. Buffing and polishing help to smooth out these flaws, resulting in a sleek and uniform finish. This step not only enhances the visual appeal of the bathtub but also improves its durability and longevity.
Achieving a Smooth, Glossy Finish
Buffing involves using a specialized buffer or polishing pad to gently remove any irregularities on the surface, such as bumps or rough patches. This process creates a smooth and even texture, providing the perfect canvas for the final polish. Polishing, on the other hand, involves applying a fine polishing compound to the surface to restore its shine and luster. Together, these techniques result in a glossy finish that rivals that of a brand-new bathtub.
Attention to Detail is Key
When buffing and polishing the surface, attention to detail is paramount. It’s essential to work methodically and systematically, ensuring that every inch of the bathtub receives equal treatment. This meticulous approach helps to achieve a consistent finish across the entire surface, leaving no room for imperfections.
The Importance of Quality Tools and Materials
To achieve professional-quality results, it’s crucial to use high-quality buffing pads, polishing compounds, and equipment. Investing in top-notch tools and materials ensures that the buffing and polishing process is efficient and effective, resulting in a stunning finish that exceeds expectations.
By mastering Step 11 of the bathtub refinishing process, you can elevate the appearance and durability of your refinished bathtub to new heights. Remember, each step in the refinishing process plays a vital role in achieving a successful outcome, so it’s essential to follow the plan meticulously.
For more expert tips and insights on bathtub refinishing, visit ArizonaBathtubRefinishing.com. 🛁✨
Step 12: Reinstall Tub Hardware
Step 12: Reinstall Tub Hardware
Ensuring Proper Functionality and Aesthetic Appeal
After meticulously refinishing the surface of your bathtub, it’s time to focus on the final details by reinstalling the tub hardware. This step may seem straightforward, but it’s crucial to approach it with care and attention to ensure both functionality and aesthetic appeal.
Functionality First
Before reinstalling any hardware, carefully inspect each piece to ensure it’s in good condition and functioning correctly. This includes handles, faucets, drains, and any other fixtures that were removed during the refinishing process. If any components are damaged or worn, now is the time to replace them to prevent issues down the line.
Proper Installation Techniques
When reinstalling tub hardware, it’s essential to use the proper installation techniques to ensure a secure and leak-free fit. Follow manufacturer guidelines and use the appropriate tools to tighten fittings and connections adequately. Taking the time to install hardware correctly will prevent future headaches and ensure the longevity of your bathtub.
Enhancing Aesthetic Appeal
Reinstalling tub hardware isn’t just about functionality; it’s also an opportunity to enhance the aesthetic appeal of your bathtub. Choose hardware that complements the newly refinished surface and adds a touch of style to the bathroom. Consider finishes that coordinate with other fixtures and decor for a cohesive look.
Final Touches and Quality Inspection
Once all hardware is installed, take a step back and admire your handiwork. Ensure that everything is aligned correctly and functioning as intended. Take the time to clean and polish the hardware to add the finishing touches to your refinished bathtub. A final quality inspection will give you peace of mind knowing that every detail has been attended to.
By following Step 12 of the bathtub refinishing process, you can ensure that your newly refinished bathtub not only looks beautiful but also functions flawlessly. Remember, attention to detail is key, so don’t rush through this important step.
For more expert tips and insights on bathtub refinishing, visit ArizonaBathtubRefinishing.com. 🛁✨
Step 13: Inspect Imperfections with Precision 🎨
Step 13: Inspect Imperfections with Precision
Using Proper Lighting for Quality Assurance
As you near the completion of the bathtub refinishing process, it’s crucial to inspect the surface with precision to ensure a flawless finish. This step involves using specialized lighting, such as blacklights, halogen flashlights, or even the flashlight on your phone, to identify any imperfections in the paint or coating.
The Importance of Proper Lighting
Proper lighting is essential for detecting imperfections that may not be visible to the naked eye. Blacklights, in particular, are effective for highlighting areas where the coating may not have adhered properly or where there are uneven patches. Halogen flashlights and phone lights can also provide additional illumination to ensure thorough inspection.
Identifying Imperfections
When inspecting the surface, pay close attention to areas where the coating may appear thin or where there are bubbles, streaks, or other irregularities. These imperfections can detract from the overall appearance of the bathtub and may indicate areas that need to be touched up or reworked.
Quality Assurance for Professional Results
By using proper lighting to inspect imperfections with precision, you can ensure that your bathtub refinishing job meets the highest standards of quality. Taking the time to identify and address any issues before completing the project will result in a beautifully refinished bathtub that looks flawless from every angle.
Final Steps for Perfection
Once imperfections have been identified, take the necessary steps to address them, whether it’s applying additional coats of paint or smoothing out uneven areas. After making any necessary adjustments, perform a final inspection to ensure that the surface is smooth, uniform, and free of defects.
By following Step 13 of the bathtub refinishing process and inspecting imperfections with precision, you can achieve professional-quality results that will impress your clients and stand the test of time.
For more expert tips and insights on bathtub refinishing, visit ArizonaBathtubRefinishing.com. 🛁✨
Step 14: Clean Up with Care 🧼
Step 14: Clean Up with Care
Ensuring a Spotless Finish
After completing the bathtub refinishing process, it’s essential to clean up with care to ensure a flawless finish and leave the surrounding area in pristine condition. This step involves removing any protective tape and coverings with precision, being mindful not to damage the newly refinished surface.
Removing Protective Coverings
Start by carefully removing any tape, plastic sheeting, or other coverings used to protect surfaces during the refinishing process. Take care to peel away the tape slowly and evenly, avoiding any sudden movements that could cause damage or leave behind adhesive residue.
Inspecting for Residue
Once the protective coverings have been removed, inspect the surrounding area for any signs of residue or overspray from the refinishing process. Use a flashlight to check for any stray paint or coating that may have landed on floors, walls, mirrors, or fixtures.
Thorough Cleaning
Use appropriate cleaning products and tools to remove any residue or overspray, taking care to avoid scratching or damaging surfaces. Wipe down all affected areas with a clean, damp cloth, followed by a dry cloth to ensure a streak-free finish.
Final Touches
Once the surrounding area is clean and free of residue, perform a final inspection to ensure that everything is in order. Check for any lingering odors or signs of damage, and address any issues promptly to ensure customer satisfaction.
By cleaning up with care after the bathtub refinishing process, you can ensure that the final result is flawless and that the surrounding area remains pristine. For more expert tips and insights on bathtub refinishing, visit ArizonaBathtubRefinishing.com. 🧼✨
Step 15: Offer Expert Care Recommendations 🛁
Step 15: Offer Expert Care Recommendations
Ensuring Longevity and Durability
After completing the bathtub refinishing process, it’s crucial to provide expert care recommendations to ensure the longevity and durability of the newly refinished surface. Proper maintenance and care can extend the lifespan of the refinishing job for many years, preserving its appearance and functionality.
Avoid Harsh Chemicals
One of the most critical care recommendations is to avoid using harsh chemicals or abrasive cleaners on the refinished surface. These can damage the coating and cause it to deteriorate prematurely, compromising its appearance and durability. Instead, use mild, non-abrasive cleaners and gentle cleaning tools to keep the surface clean without causing damage.
Regular Cleaning and Maintenance
Regular cleaning and maintenance are essential to keep the refinished surface looking its best. Wipe down the surface regularly with a soft cloth or sponge to remove dirt, soap scum, and other debris. For stubborn stains, use a mild cleaning solution and avoid scrubbing too vigorously to prevent damage.
Protective Measures
To prevent damage and prolong the life of the refinished surface, consider using protective measures such as bathtub mats or liners. These can help reduce the risk of scratches, chips, and other damage caused by everyday use. Additionally, avoid placing sharp or heavy objects directly on the surface to prevent dents and scratches.
Regular Inspections
Periodically inspect the refinished surface for any signs of wear, damage, or deterioration. Address any issues promptly to prevent them from worsening and compromising the integrity of the refinishing job. By staying proactive and attentive to maintenance needs, you can ensure that your bathtub refinishing job lasts for many years to come.
By following these expert care recommendations, you can ensure that your bathtub refinishing job remains in top condition for years to come. For more tips and insights on proper care and maintenance, visit ArizonaBathtubRefinishing.com. 🛁✨
Subscribe

Opening Hours
Monday | 8am – 11pm
Recent Comments