
Mastering Bathtub Refinishing: Steps 6 to 10
Mastering Bathtub Refinishing: Steps 6 to 10
Bathtub refinishing, also known as bathtub reglazing, is a popular and cost-effective method for revitalizing worn or outdated tubs. This comprehensive process involves several steps to transform a tired bathtub into a gleaming centerpiece of the bathroom. From initial preparation to final inspection, each stage of the refinishing process plays a crucial role in achieving a durable and aesthetically pleasing result.Step 6: Prep the Surface for Glaze Application
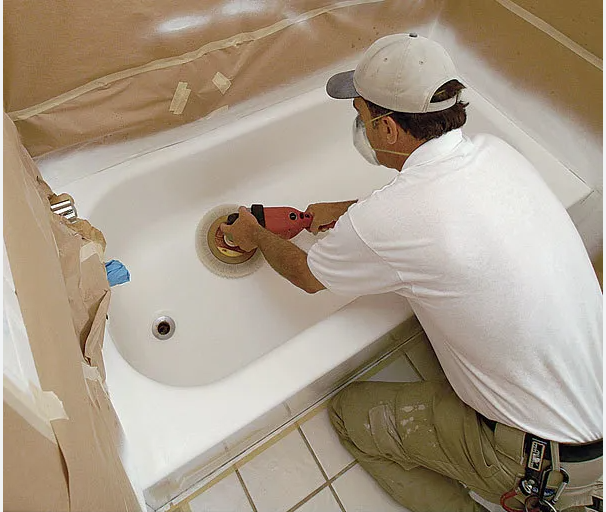
Prepping the surface is a critical step in ensuring a successful refinishing job. This involves thoroughly cleaning the tub to remove any dirt, grime, or residue that could affect the adhesion of the glaze. It also includes repairing any chips, cracks, or imperfections in the surface to create a smooth and uniform base for the glaze application.Step 7: Mix and Apply the Epoxy Coating
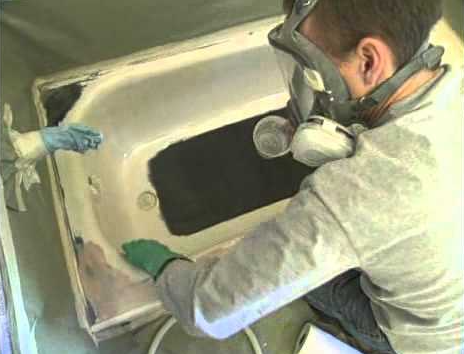
Once the surface is prepped and ready, it’s time to mix and apply the epoxy coating. This specialized coating is designed to adhere to the bathtub surface and provide a durable and long-lasting finish. Careful attention should be paid to mixing the coating according to the manufacturer’s instructions and applying it evenly to ensure a seamless result.Step 8: Apply Final Coats
After applying the epoxy coating, multiple final coats may be required to achieve the desired level of coverage and durability. Each coat should be applied carefully and allowed to dry fully before applying the next coat. This helps to build up the thickness of the coating and ensures a smooth and flawless finish.Step 9: Apply Caulk and Perform Finishing Touches
Once the final coats have been applied and dried, it’s time to apply caulk to seal the edges of the tub and perform any necessary finishing touches. This may include smoothing out any rough edges, removing any excess caulk, and ensuring that the tub hardware is properly reinstalled.Step 10: Allow Sufficient Drying Time
Finally, it’s crucial to allow sufficient drying time for the epoxy coating to cure fully. This typically takes at least 24 hours, but it’s essential to follow the manufacturer’s recommendations for drying and curing times to ensure the best results. Rushing this step could compromise the durability and longevity of the refinished bathtub. By following these steps diligently and with attention to detail, you can achieve professional-quality bathtub refinishing results that will transform your bathroom and provide years of enjoyment. For more tips and information on bathtub refinishing, visit ArizonaBathtubRefinishing.com. 🛁✨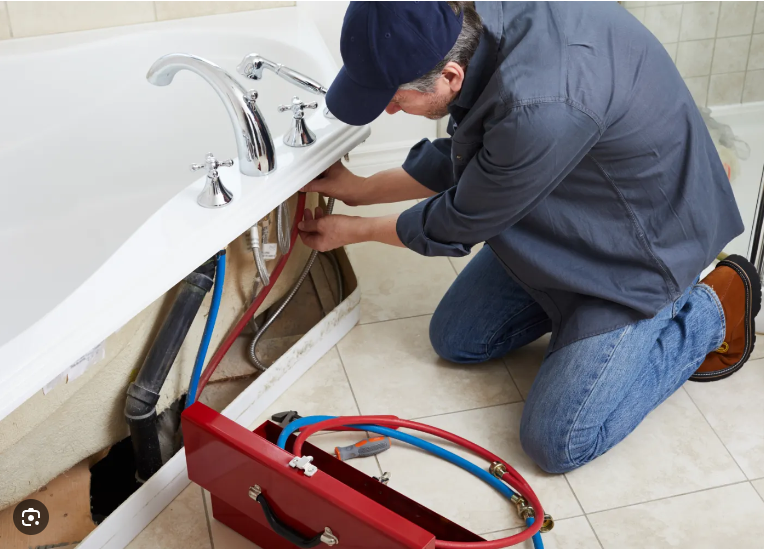
1
2
3
4
Step 6: Prep the Surface for Glaze Application 🚿
Step 6: Prep the Surface for Glaze Application 🚿
Importance of Surface Preparation
Properly prepping the surface before applying the glaze is essential for achieving a smooth and long-lasting finish. 🛁 This step sets the foundation for the entire refinishing process and ensures that the glaze adheres properly to the bathtub surface. 🛠️Cleaning the Surface
The first step in prepping the surface is to thoroughly clean the bathtub. This involves removing any dirt, grime, or residue that may be present. 💧 Specialized cleaners or degreasers are often used to ensure that the surface is completely free of contaminants. 🧼Repairing Imperfections
In addition to cleaning, any chips, cracks, or imperfections in the bathtub surface must be repaired before applying the glaze. 🛠️ This may involve filling in the damaged areas with a specialized filler or epoxy compound and sanding them smooth to create a seamless surface. 🔨Smoothing the Surface
Once the surface is clean and repaired, it’s important to ensure that it is smooth and free of any rough patches or uneven areas. 🔄 Sanding the surface with fine-grit sandpaper can help to smooth out imperfections and create a uniform base for the glaze application. 🧽Applying a Primer
Finally, before applying the glaze, a primer may be applied to the surface to improve adhesion and ensure a durable finish. 🖌️ The primer acts as a bonding agent between the bathtub surface and the glaze, helping to create a strong and long-lasting bond. 🛠️ By following these steps and properly prepping the surface for glaze application, you can ensure that your bathtub refinishing project is a success. For more tips and information on bathtub refinishing, visit ArizonaBathtubRefinishing.com. 🌟Step 7: Mix and Apply the Epoxy Coating 🎨
Step 7: Mix and Apply the Epoxy Coating 🎨
Importance of Proper Epoxy Coating Application
Applying the epoxy coating is a critical step in bathtub refinishing that requires precision and attention to detail. 💡 The epoxy coating not only provides a durable and protective layer but also contributes to the overall appearance and longevity of the refinished bathtub. 🛁Mixing the Epoxy
Before applying the epoxy coating, it’s important to mix the epoxy resin and hardener in the correct proportions. ⚗️ Proper mixing ensures that the epoxy cures properly and adheres effectively to the bathtub surface. 🔄 This step should be done carefully to avoid any errors that could compromise the quality of the finish. 🧪Applying the Epoxy
Once the epoxy is mixed, it can be applied to the bathtub surface using a brush, roller, or sprayer, depending on the product and preference of the refinisher. 🖌️ The epoxy should be applied evenly and smoothly to ensure a uniform coating and minimize the risk of drips or uneven areas. 🛠️Ensuring Proper Coverage
It’s important to ensure that the entire bathtub surface is adequately covered with the epoxy coating to provide maximum protection and durability. 🛁 This may require applying multiple coats of epoxy, with sufficient drying time between each coat. ⏱️ Proper coverage is essential for achieving a long-lasting and professional-quality finish. 🌟 By following the proper procedures for mixing and applying the epoxy coating, you can ensure that your bathtub refinishing project is a success. For more tips and information on bathtub refinishing, visit ArizonaBathtubRefinishing.com. 🚿Step 8: Apply Final Coats 🎨
Step 8: Apply Final Coats 🎨
Importance of Applying Final Coats
Applying final coats is a crucial step in bathtub refinishing that ensures a smooth and durable finish. 💪 The final coats provide an extra layer of protection and enhance the appearance of the refinished bathtub, giving it a glossy and professional look. 🛁
Ensuring Even Coverage
When applying the final coats, it’s essential to ensure even coverage across the entire bathtub surface. ⚠️ Uneven application can result in visible streaks or patches, detracting from the overall finish quality. 🚫 Using the right tools and techniques, such as a high-quality brush or sprayer, can help achieve a smooth and consistent coating. 🖌️
Allowing Sufficient Drying Time
After applying the final coats, it’s crucial to allow sufficient drying time before handling or using the bathtub. ⏰ Rushing this step can lead to smudges, fingerprints, or other imperfections in the finish. 🕰️ Following the manufacturer’s recommendations for drying time ensures that the final coats cure properly and achieve their maximum durability. 🌟
Inspecting the Finish
Once the final coats have dried, it’s essential to inspect the finish carefully for any imperfections or defects. 🔍 This inspection allows refinishing professionals to address any issues promptly and ensure that the bathtub meets the highest quality standards. ✅ Taking the time to inspect the finish ensures a flawless and long-lasting result. 🛠️
By applying the final coats correctly and allowing sufficient drying time, you can achieve a beautiful and durable finish for your refinished bathtub. For more tips and information on bathtub refinishing, visit ArizonaBathtubRefinishing.com. 🚿
Step 9: Apply Caulk and Perform Finishing Touches 🛠️
Step 9: Apply Caulk and Perform Finishing Touches 🛠️
Importance of Applying Caulk
Applying caulk is a crucial step in bathtub refinishing that helps seal gaps and joints, preventing water damage and ensuring a seamless finish. 💧 Caulk helps create a watertight seal around the edges of the bathtub, protecting against leaks and moisture intrusion. 🚿 Additionally, caulking enhances the overall aesthetics of the refinished bathtub, providing a clean and polished look. ✨Performing Finishing Touches
After applying caulk, it’s essential to perform finishing touches to ensure that every detail is perfect. 🎨 This may include smoothing out the caulk lines, removing any excess caulk, and touching up any areas that may need additional attention. 🖌️ Taking the time to perform these finishing touches ensures that the bathtub refinishing project is completed to the highest standards and meets the client’s expectations. 👌Ensuring Quality and Durability
By applying caulk and performing finishing touches, refinishing professionals can ensure that the bathtub not only looks great but also functions effectively for years to come. 🏠 Properly sealed joints and edges prevent water damage and prolong the life of the refinished bathtub, providing homeowners with peace of mind and long-term satisfaction. 💯 For more tips and information on bathtub refinishing, visit ArizonaBathtubRefinishing.com. 🌟Step 10: Allow Sufficient Drying Time ⏰
Step 10: Allow Sufficient Drying Time ⏰
Importance of Allowing Drying Time
After applying the final coats of epoxy coating, it’s crucial to allow sufficient drying time for the bathtub to cure properly. 🛁 Allowing the coating to dry completely ensures that it adheres securely to the surface of the bathtub, creating a durable and long-lasting finish. ⏳ Rushing this step could result in premature damage or imperfections in the refinished surface, undermining the quality of the entire refinishing project. 🚫Factors Affecting Drying Time
The drying time required for epoxy coatings can vary depending on several factors, including temperature, humidity, and ventilation. 🌡️ In general, warmer temperatures and lower humidity levels promote faster drying times, while cooler temperatures and higher humidity levels may extend the drying process. 💨 Adequate ventilation is also essential for expediting drying and ensuring a smooth, even finish. 🌬️Patience Pays Off
While it may be tempting to rush through the drying process to complete the project quickly, patience is key to achieving the best results. ⌛ Allowing sufficient drying time ensures that the epoxy coating cures properly, maximizing its durability and longevity. 🌟 By following the recommended drying times specified by the manufacturer and exercising patience, refinishing professionals can deliver high-quality results that meet or exceed customer expectations. 👍 For more information on bathtub refinishing and professional services, visit ArizonaBathtubRefinishing.com. 🛠️Subscribe

Opening Hours
Monday | 8am – 11pm
Recent Comments